
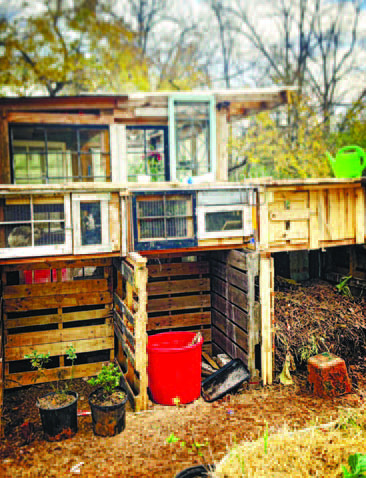
“…my vegetable garden is all ‘no-dig.’ I spend more time making compost than growing veg!”
When you fall down the gardening rabbit-hole you will undoubtedly come to the realization there is never enough compost. This is especially true if you explore the no-dig method, as popularized by Charles Dowding on YouTube—you will be hard-pressed to find enough.
As we assess various methods of garden-scale composting, let’s remind ourselves of the benefits of using compost in our garden:
• Itfeedsthemicroorganismsinthe soil, which in turn feed the plants;
• It’s a natural weed barrier when applied as a mulch;
• Itimprovesdrainageandaerationin the soil. Bagged compost is costly, though, and can be contaminated with persistent herbicides. It’s also increasingly poorly made.
If you are serious about your garden, you need to make your own compost. Here is what you will need:
• Thebrowns:Carbon-richmaterials like cardboard, paper, pine needles, tree leaves, straw, dried grass clippings;
• Thegreens:Nitrogen-richleafystuff, pulled weeds, coffee grounds, kitchen scraps, fresh grass clippings;
• Thebulkingadditives:Well-rotted woodchips, chicken coop litter, manures, spent potting soil. Collect browns throughout the year, greens are collected fresh. Make weeding day and lawn-mowing day into compost-pile building day as well.
Thermophilic Days Are Here Again
Thermophilic compost is the familiar three-bin setup that involves the turning of piles and takes 3-6 months to complete. It is an aerobic, oxygenrich process that produces heat as a byproduct. The heat renders weedseed in the compost that’s less likely to germinate, and it should kill most soilborne pathogens.
As the leaves are falling from Eatonton’s pecan trees, gather them and build your first pile. Start with 12 inches of browns for the bottom of the pile, followed by alternating 1-to-6-inch layers of greens (fine lawn clippings in 1-inch layers, leafy bug-bit collards, 6 inches), and 6-to-8-inch layers of browns.
Water each layer well—rain or well water is best if you have it because the chlorine in city water can kill the bacteria that do the work.
I finely chop leaves with my pushmower, expediting the composting process. Greens break down fast, browns need help.
Your pile should be roughly 4-feet square by 4-feet high when assembled. Cover it with a tarp to keep moisture and heat in. It can take a few days to get cooking, then monitor temperature with a compost thermometer. Water it again when the temperature starts to drop off.
When watering the pile does not cause an increase in temperature it is time to turn the pile into the second bin, layering in your bulking additives if available, then build a new pile in the first, and continue the process again until you cycle the compost through all three bins. When it comes out of the third, it should be broken down well enough for sifting and use.
Until next time, Your Eatonton Gardenerd This week’s jobs: Go pallet hunting – Assemble compost pile – Plant garlic Fellow Gardenerds! Send questions, concerns, and tips to: garden. nerd.31024@gmail.com